Step 1: Download COE from the Server
After recruiters submit an ECOE, the ECOE goes to the NY Server. In order for you to review and accept the ECOE, you need to download it first.
- Go to "Procedures" and select "Upload Changes"
- Click "Begin Upload"
- TIP! Upload changes AT LEAST twice a day to check if a COE have been approved or rejected.

Step 2: COE Draft Section
Just like we have a Student Side and a COE side, we have a specific section for us to review and approved the ECOEs
- Go to "View" and select "COE Draft"
Now you can use the navigation arrows to see and review all new ECOEs that need to be approved
Also notice that you can get information about the dates the COE was "Created" and "Modified" on the right side of the screen and/or "View Log"

Step 3: Review the Information:
Make sure you review every page in the ECOE side (Census, Qualifying, Signatures, Elig Comments). Make sure that the information in every section is correct, ESPECIALLY the Signatures and Elig Comments pages since they are a new section in our system.
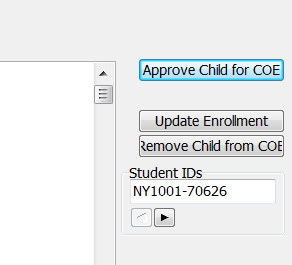
Child(ren) Section
Now that you review all other COE side pages, let's focus our attention to Child(ren)
- Go to the Child(ren) page on the COE side. Click "Approve Child for COE". This will open the Search Children tab
- Click "Do Search for Child" to check if the student was enrolled in your program.
- If you cannot find the child, click "Search Remote" to search all NY database
- If you find the student, click "Select Student"
- If you did not find a match click "New Student"
- Finally, add enrollment date which normally matches the Residency Date
TIP! Make sure when adding a child there is NOT blank spaces between the Bar and the student name. When this occurs, it means that a new child ID and field has being created. If this happens, click on the blank space and click on "Remove child from COE"
![]()
Step 4: Print COE
After reviewing all information go to COE on the top panel
- Click "Queue COE" and "Print Queue COE"
- TIP! Make sure you print the COE since after clicking ""Approve", you will not see the COE until the ID&R reviewer "Accepted" the COE!
Step 5: Approving and Uploading the COE
- After you have verified the information and printed the COE, you can click "Approve COE"
- When you "Approve COE", you will not be able to find/change the student information or the COE on your system. However, you will be able to review the information on the "Student Side" if the student already existed in the NY database. Still, you will not be able to add information and a message will say "Unapproved Enrollment".
- Now that you approved the COE, you need to send it to the ID&R reviewer
- Go to Procedures/Upload changes
Step 6: Completing the Student Information
- After the ID&R reviewer has accepted the COE, you will receive it after you click "Upload Changes"
- Search for the Student
- Finish entering the information. Example: School district, any missing enrollment lines